Quickly set up your own collaboration infrastructure on premise.
The collaboration feature requires a separate server application. For production use, we strongly recommend to host that server application yourself. Depending on your confluence platform and security requirements, several different configurations are possible. The server component is distributed in the following variants:
Note that a secure endpoint is required if you use Confluence Cloud.
Now the feature is enabled in Graphity. If multiple users edit the same diagram macro, collaboration starts automatically and is synchronized via the collaboration server.
In a setup without a secure endpoint, the Graphity client connects directly to a HTTP port on the collaboration server:
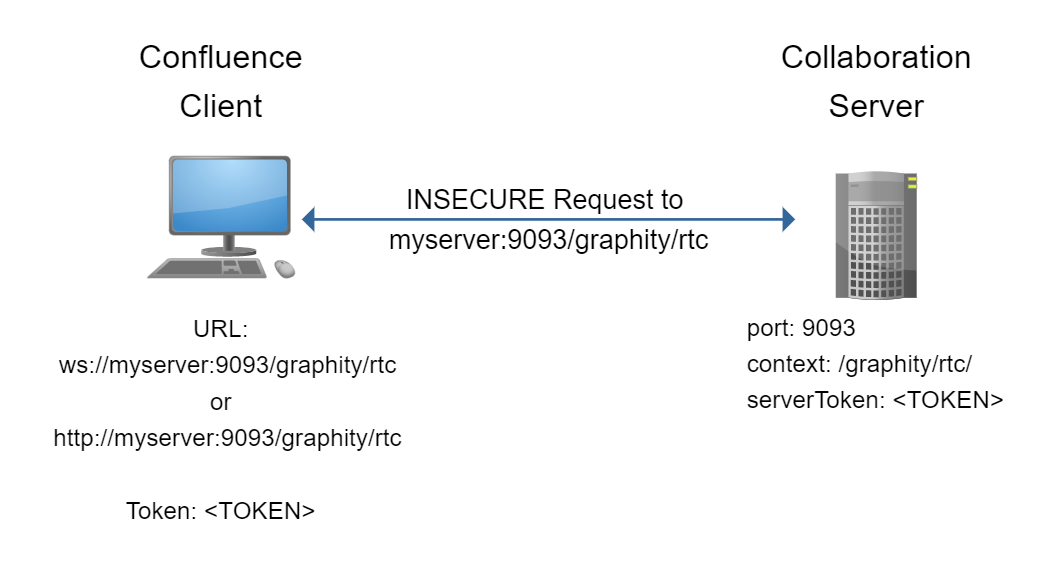
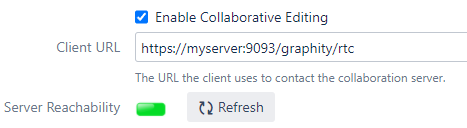
In this setup, Graphity might be configured like this:
docker run -e SERVER_TOKEN=<TOKEN> -p 9093:9093 -d --restart unless-stopped yworksgmbh/graphity-collaboration-server
The following environment variables are available. Only SERVER_TOKEN must be set.
| Variable | Meaning | Default | Required? |
|---|---|---|---|
SERVER_TOKEN | Identification token from the Graphity admin page | Yes | |
SERVER_PORT | The port of the endpoint | 9093 | No |
SERVER_CONTEXT | The path component of the endpoint URL | /graphity/rtc | No |
LOGLEVEL | Verbosity of logging output. One of ALL, FINE, FINER, FINEST, INFO, WARNING, SEVERE, OFF. | WARNING | No |
java -jar graphity-collaboration-server-1.0.0.jar -t <TOKEN>
The following commandline options are available:
-c,--context <CONTEXT>       The context URL the server will listen on. Default value is /graphity/rtc.
-disableClientVerification   Disable verification of incoming client connections.
-f,--propertyFile <FILE>     Property file for all command line arguments.
-h,--help                    Print usage.
-i,--interface <INTERFACE>   Interface or hostname the server should listen on.
                             If not set, the server listens on all interfaces.
-keystoreLocation <KEYSTORE> The path to the Java keystore containing the SSL certificates if SSL is enabled.
-keystorePassword <PASSWORD> The password for the Java keystore containing the SSL certificates if SSL is enabled.
-l,--logLevel <LOGLEVEL>     The log level. Default ist WARNING.
-p,--port <PORT>             The port the server will listen on. Default value is 9093.
-q,--quiet                   Hide startup messages.
-s,--useSSL                  Enable SSL for this server.
-t,--serverToken <TOKEN> The unique token that allows to verify incoming client connections.If you need to provide a secure endpoint, you have these basic options:
You can also combine these options if the proxy and the collaboration server need to communicate over an insecure network.
In this setup, the Graphity client connects directly to a HTTPS port on the reverse proxy, which then communicates with the collaboration server:
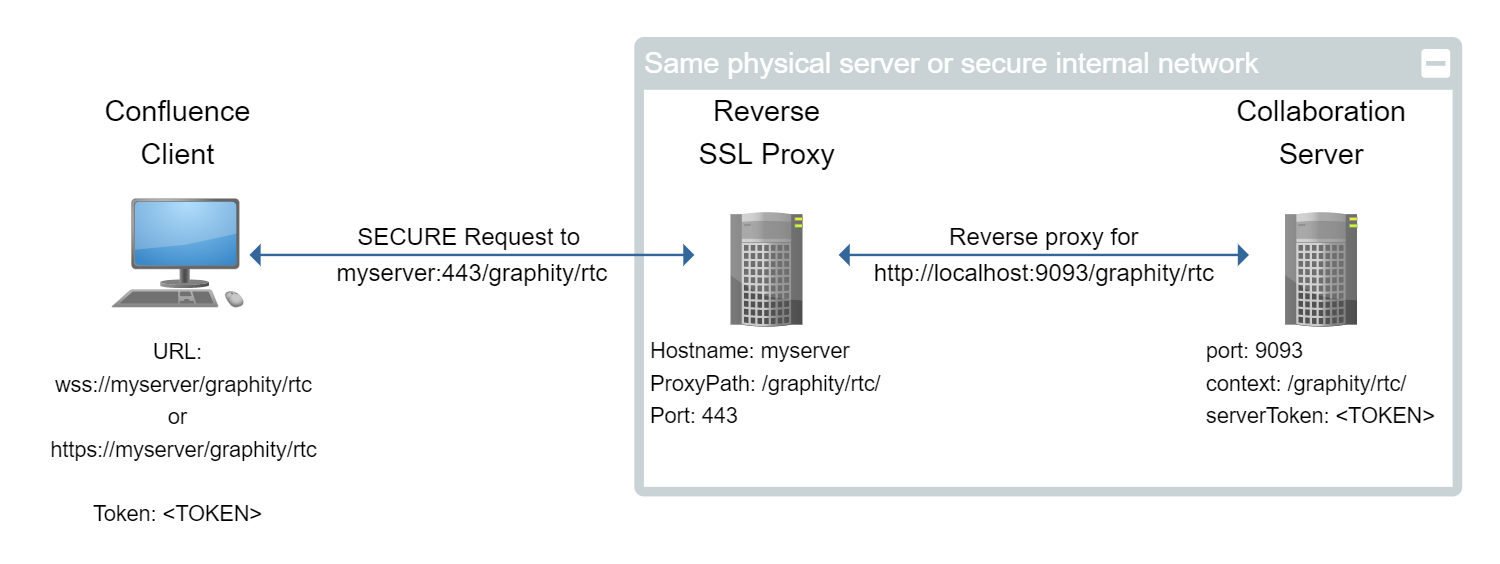
In this setup, Graphity might be configured like this:

First, set up the collaboration server without encryption, as described here: Setup without SSL
Then, configure the reverse proxy to forward requests to the collaboration server:
Sample setup for Apache 2.4:
You will need to enable the following Apache modules (if they are not already enabled):
mod_proxymod_proxy_httpproxy_wstunnelmod_rewriteIn your virtual host definition, you need these directives:
ProxyRequests Off ProxyPreserveHost On

ProxyPass "/graphity/rtc" "http://127.0.0.1:9093/graphity/rtc"

<Location /graphity/rtc>
  Require all granted
  RewriteEngine on
  RewriteCond %{HTTP:UPGRADE} ^WebSocket$ [NC]
  RewriteCond %{HTTP:CONNECTION} Upgrade$ [NC]
  RewriteRule .* ws://127.0.0.1:9093%{REQUEST_URI} [P]
</Location>
Sample setup for NGINX:
location /graphity/rtc {
  proxy_set_header X-Forwarded-Host $host;
  proxy_set_header X-Forwarded-Server $host;
  proxy_set_header X-Forwarded-For $proxy_add_x_forwarded_for;
  proxy_pass http://localhost:9093//graphity/rtc;
  proxy_http_version 1.1;
  proxy_set_header Upgrade $http_upgrade;
  proxy_set_header Connection "Upgrade";
}Clone our git repository:
git clone https://github.com/yWorks/graphity-collaboration-server
Make necessary adjustments to docker-compose.yml. At the very least, you need to provide the correct server token and the hostname where the clients can reach the collaboration server.
Place the certificates in proxy/volumes/certs. They should be named <myserver>.crt for the certificate and <myserver>.key for the private key.
The proxy component of the stack is based on jwilder/nginx-proxy. Consult the documentation there for more advanced scenarios or if you want to create your own compose setup.
Start the stack:
docker-compose up
In this setup, the Graphity client connects directly to a HTTPS port on the collaboration server:
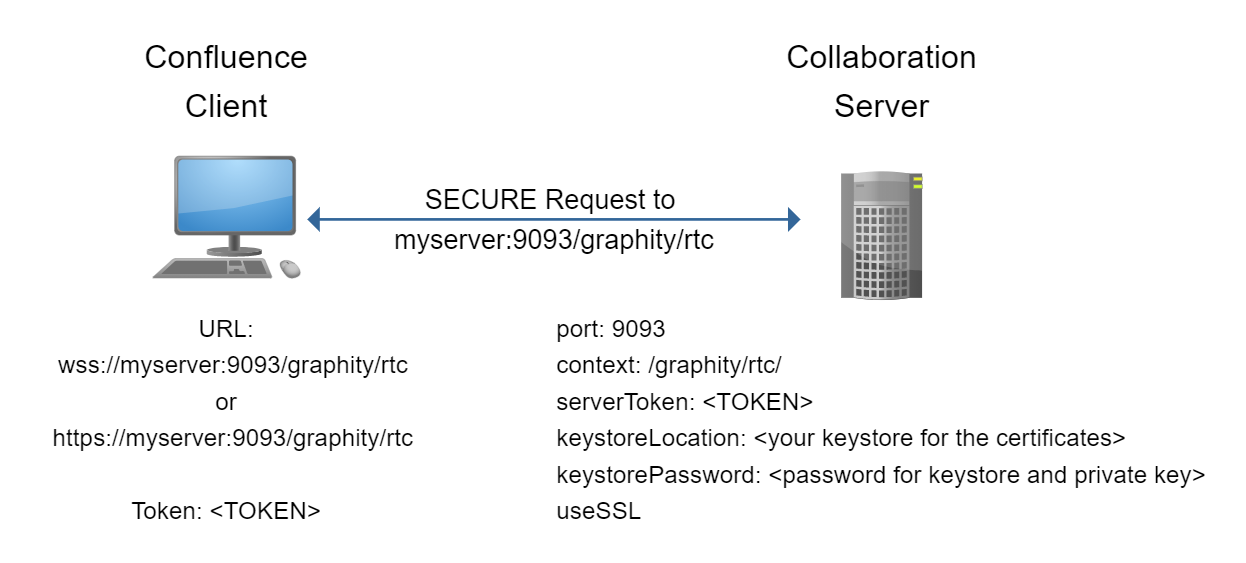
In this setup, Graphity might be configured like this:
First, you need to create a Java keystore containing the certificates. Please refer to the Java keytool documentation.
The resulting keystore must contain only one certificate pair, and you must use the same password for the private key and the store itself.
Run the collaboration server with SSL enabled:
java -jar graphity-collaboration-server-1.0.0.jar -t <TOKEN> -keystoreLocation myserver.keystore -keystorePassword changeit -s